What is GPGPU Programming?
In this post, I explain the main difference between a CPU and a GPU. I also discuss why applications run faster on a GPU and how we can code a simple program that performs computations on a GPU.
GPGPU (General-Purpose Graphics Processing Unit) programming refers to the use of graphics processing units (GPUs) for general-purpose computing tasks like machine learning and scientific computing that are beyond graphics rendering. The next question is, how much of a difference can it make to solve a problem on a GPU compared to a CPU? To answer this, I will use simple matrix multiplication as an example, and Figure 1 shows the time comparison when the two matrices are of size \(30000 \times 30000 \).

I hope you're now intrigued to learn more about how GPUs can accelerate different computational tasks. But first, I will explain the basics of GPGPU computing by answering three simple questions.
- What is the main difference between a CPU and a GPU?
- Why do applications run faster on a GPU, and is that always true?
- How can I code a simple program that performs computations on a GPU?
Introduction
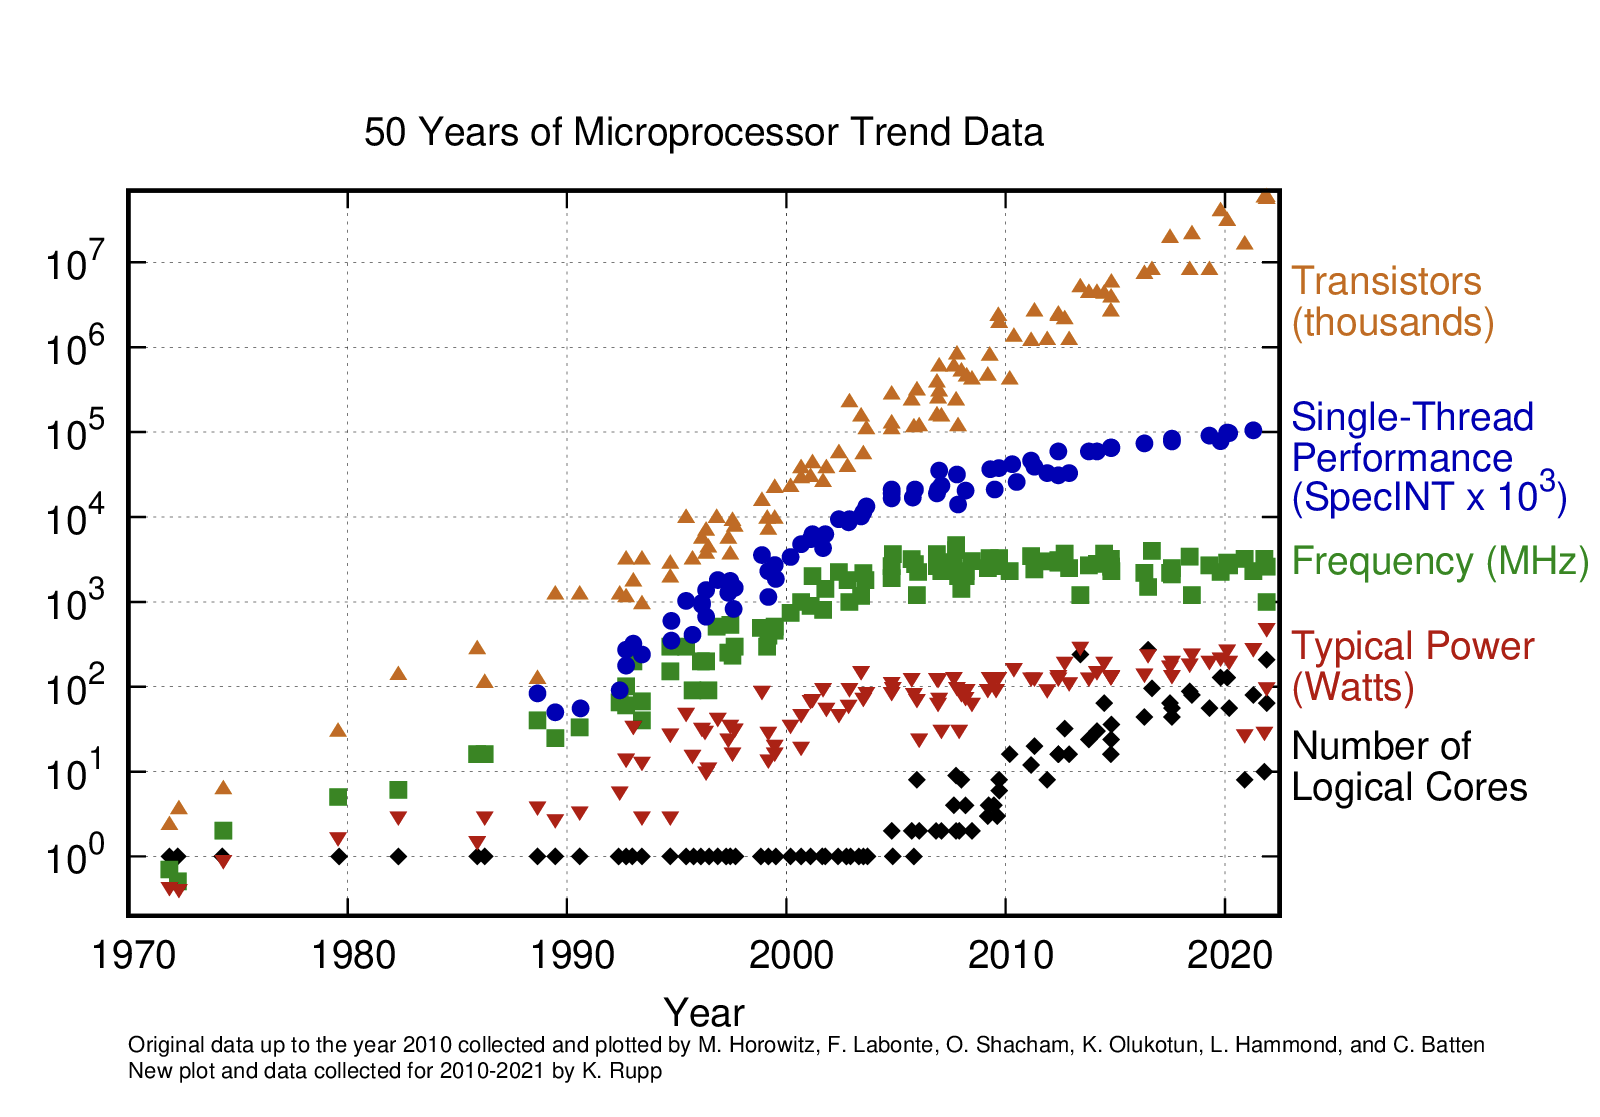
Every year, with the release of new processors, we notice a bump in performance. This was quite significant in the early years (1980s and 1990s) when the applications relied on the advancement of processor speed, memory speed, and memory capacity. However, since 2003, this drive has slowed down because of issues like energy consumption and heat dissipation. This is evident in Figure 2, where you can see that the single thread performance (blue scatter plot) has flattened a bit in recent times (even though the number of transistors keeps increasing).
So, the only way to increase performance (in a significant way) now is by utilizing parallelism. Parallelism in computers refers to the ability to perform multiple computations or processes simultaneously, and there are two broad types of parallelism:
- Task Parallelism: Two tasks can be done independently (at the same time). A common example is data transfer, which involves transferring multiple chunks of data together.
- Data Parallelism: Most modern applications run slowly because of too much data. The core idea behind data parallelism is that we can work on chunks of the same data independently (at the same time). Vector addition is the simplest example for this case.
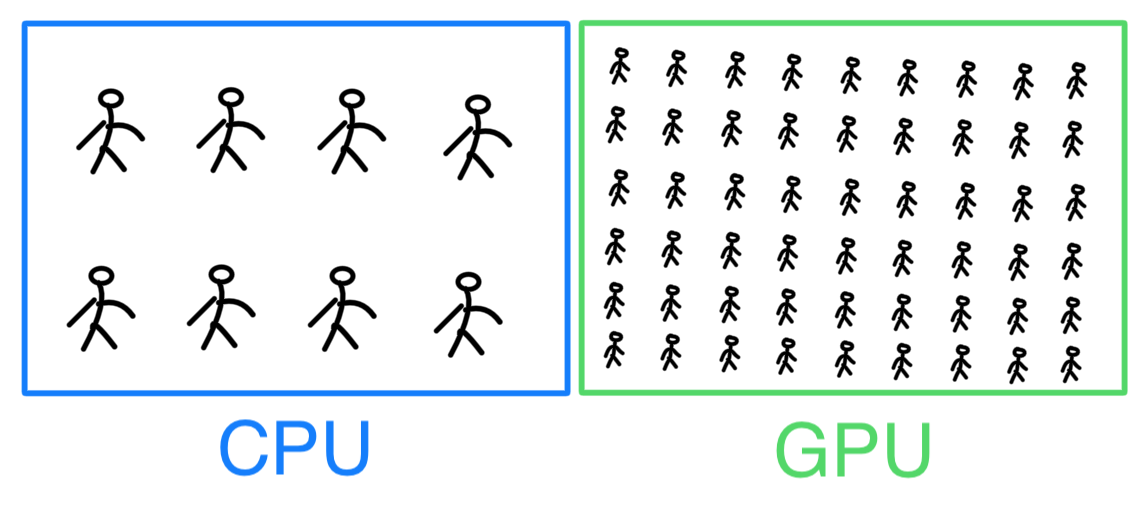
Data parallelism is the main source of scalability (and speed-up) for many modern programs, and we hear a lot about GPUs nowadays because they're designed specifically for this task. That does not mean GPUs are best at everything, and we should forget about CPUs. There are major differences in the design philosophy of CPUs and GPUs, but in the simplest terms, you can think of a
- CPU: As a small team of highly skilled workers where each worker can finish the task at hand quickly.
- GPU: As a large team of less skilled workers, each worker is a bit slower in doing their work.
Hence giving CPUs an edge over GPUs when
- The problem is complex as the highly skilled workers will be more suitable here.
- The problem is small because highly skilled workers can finish the tasks quickly. Figure 3 demonstrates this using matrix multiplication, where I'm plotting the runtime for CPU and GPU as the matrix size increases.
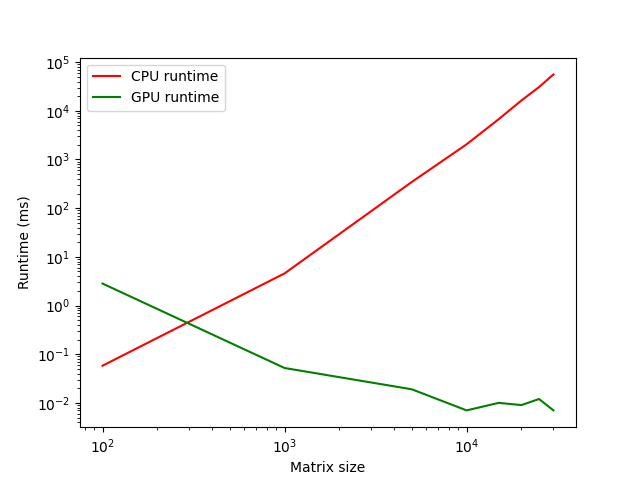
From Figure 3, it is evident that for small problems (i.e., small matrices in this case), the CPU has a shorter runtime. However, as the problem size increases, we get a crossover point where GPU starts outperforming CPU, and for really large problems, the speed-up can be as high as \(173407 \times \).
GPGPU programming model
In this blog (and the ones in the future about GPGPU programming), I will write programs in CUDA C to exploit data parallelism. CUDA C extends C programming language with minimal new syntax and library functions to allow programs to run on GPU and CPU cores (heterogeneous computing). The structure of a CUDA C program reflects the presence of a host (CPU) and one or more devices (GPUs). It is such that the execution starts with the host, and the host assigns very specialized tasks to the device.
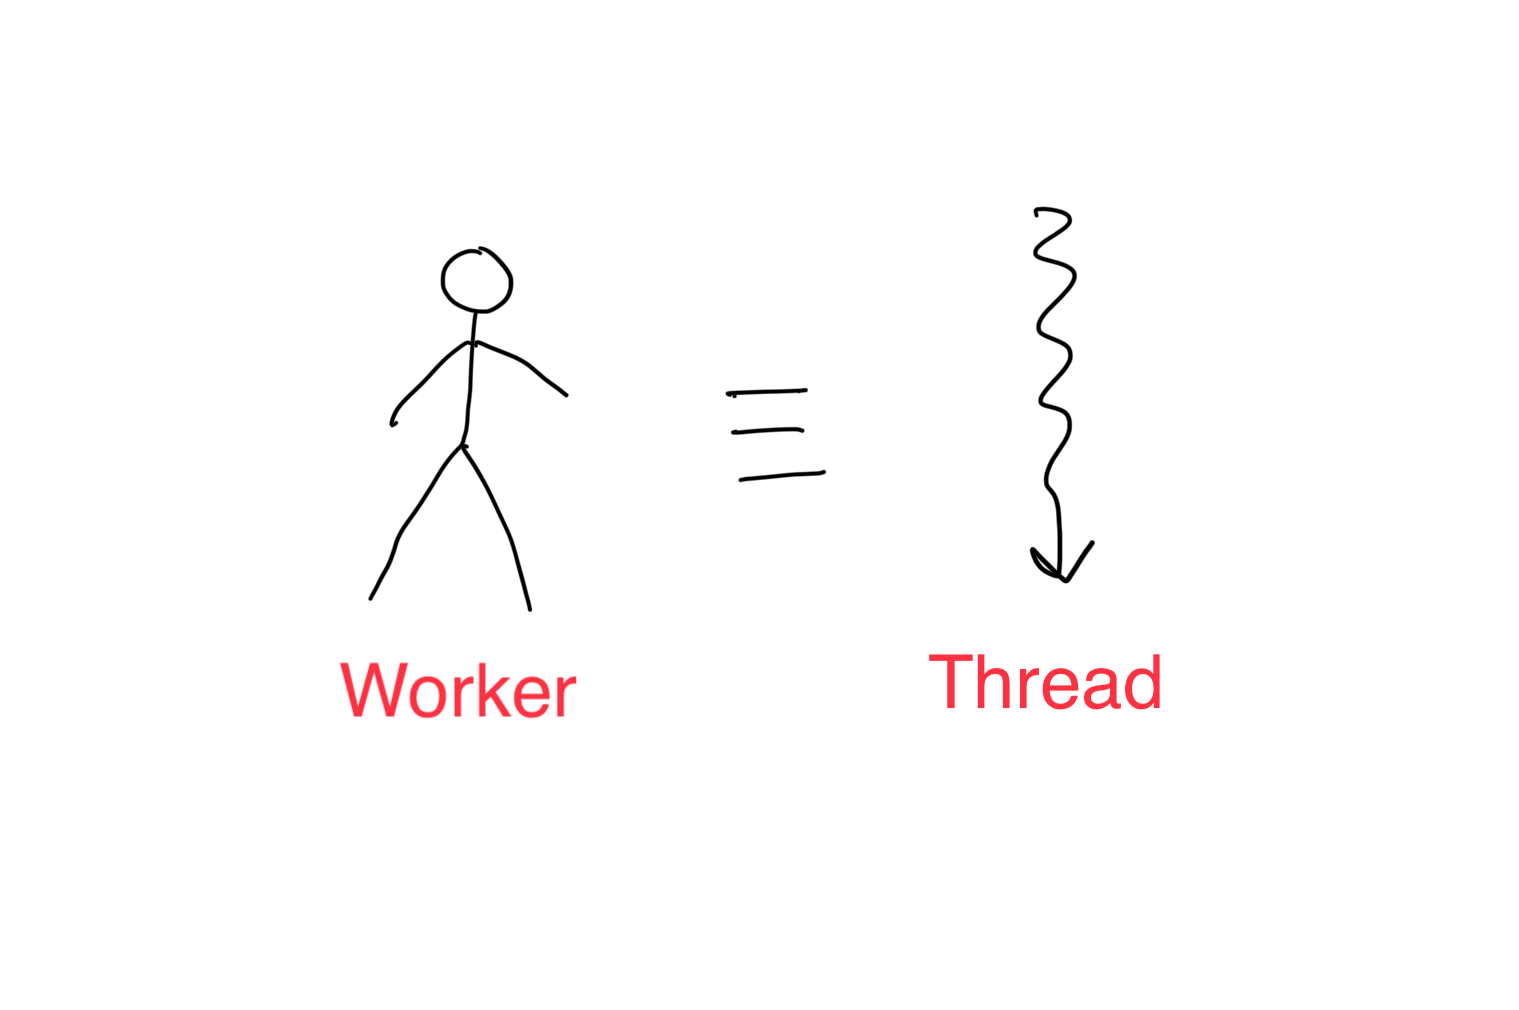
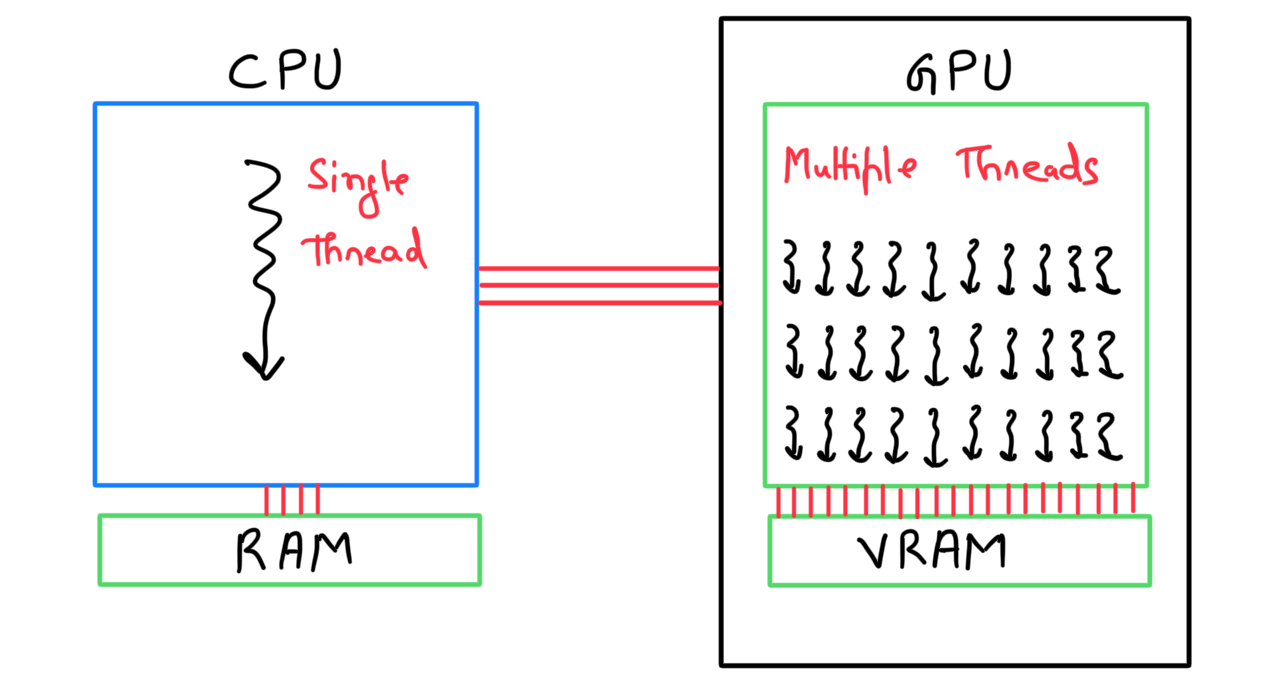
Threads are at the heart of modern computing. A thread is a simplified view of how a processor executes a sequential program in modern computers. Adhering to the worker analogy, a thread can be seen as an individual worker, and the execution of a thread is sequential as far as a user is concerned (i.e., a worker can only do one task at a time).
When a program starts, there is a single CPU thread that sets up the stage for everything and then calls a kernel function (a function that is defined to only run on GPU). Many threads are then launched on the GPU, which executes the same kernel function and processes different parts of the data in parallel. Once the task assigned to the GPU finishes, the reigns are returned to the CPU, which can either end the program or call another kernel function for a different task.
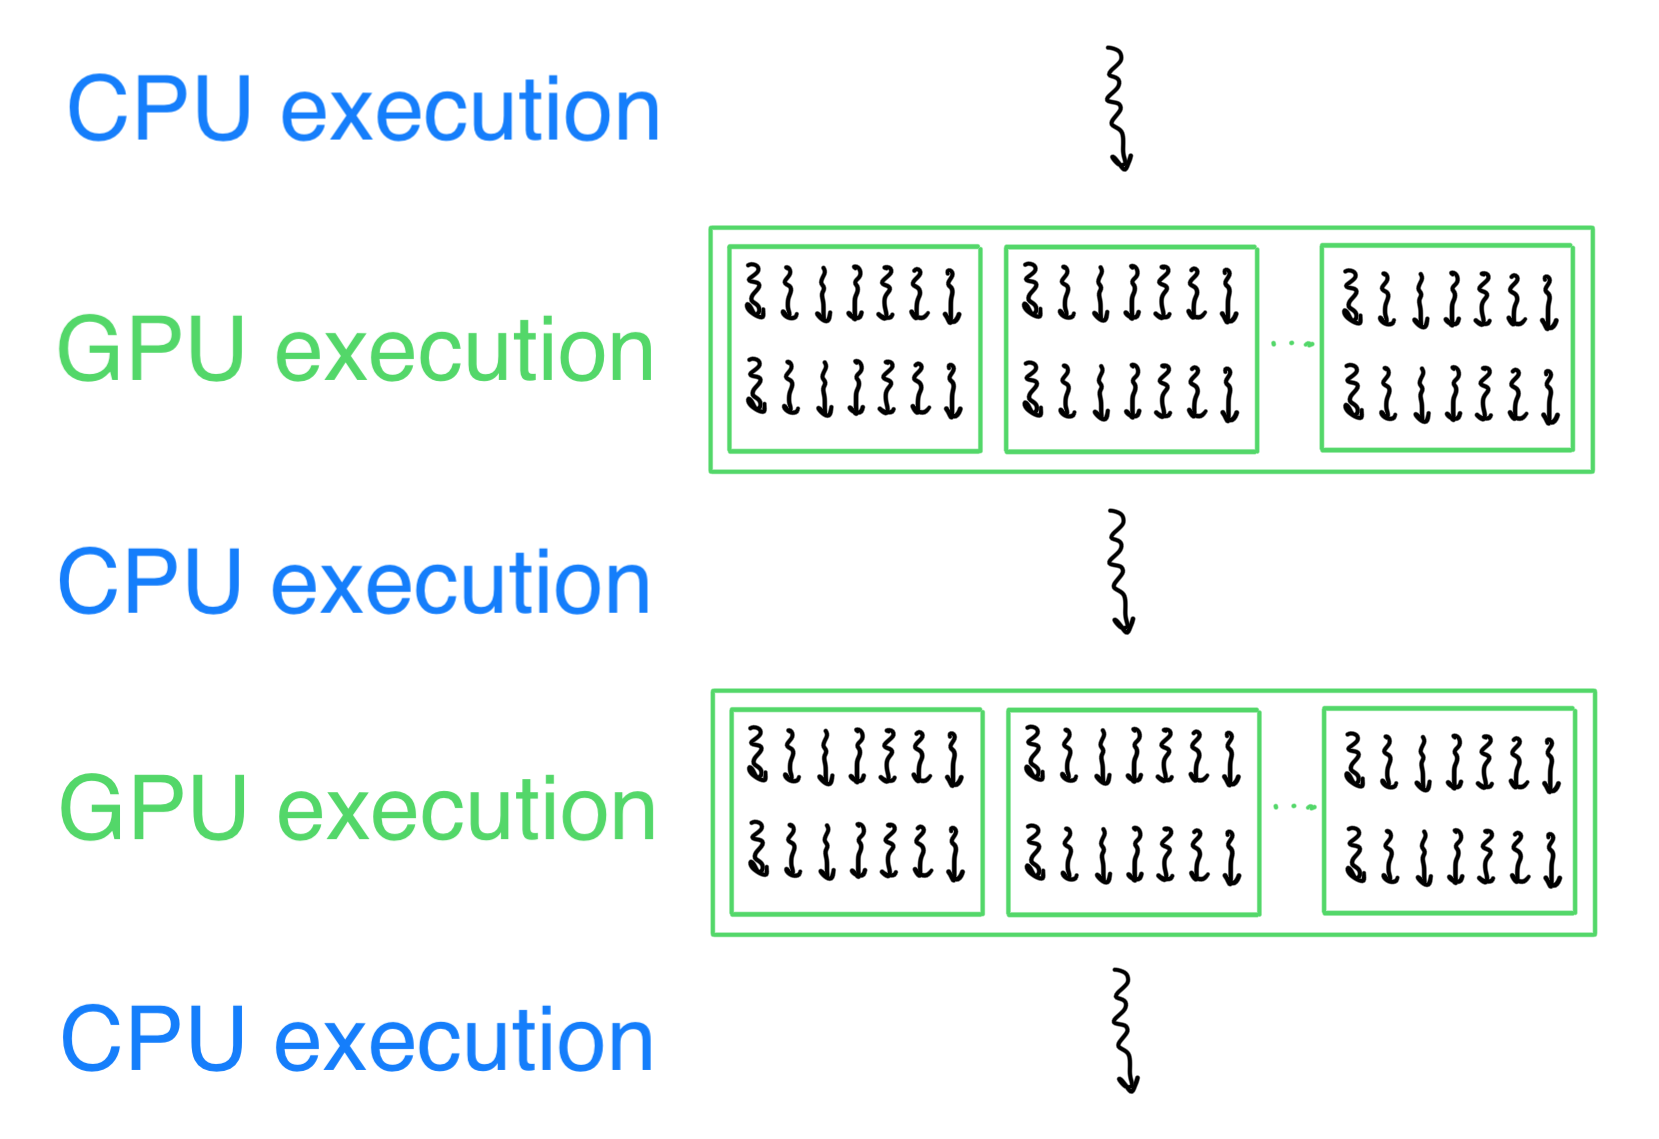
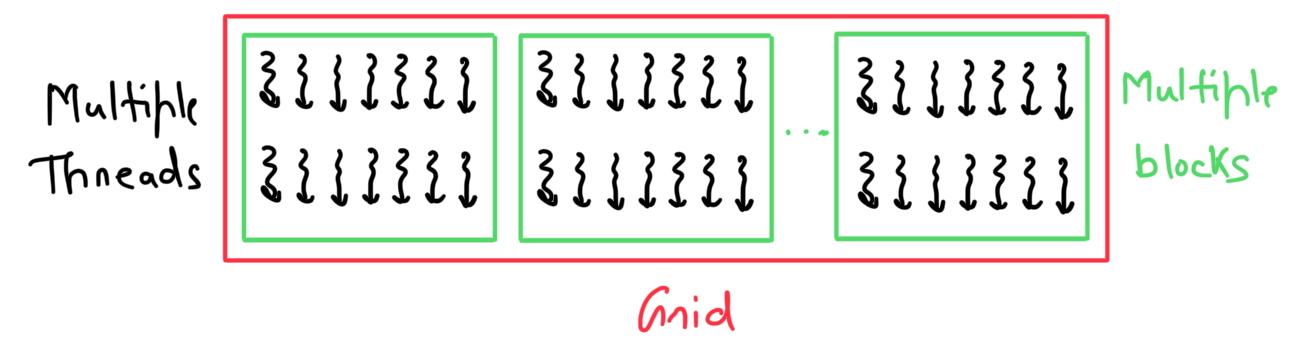
The threads generated by a GPU are organized systematically. Whenever a CPU calls a kernel function, a grid is created on the GPU. This grid is divided into multiple blocks, which contain several threads (each block must have the same number of threads). The programmer decides the number of blocks in a grid and threads in a block.
A vector addition example
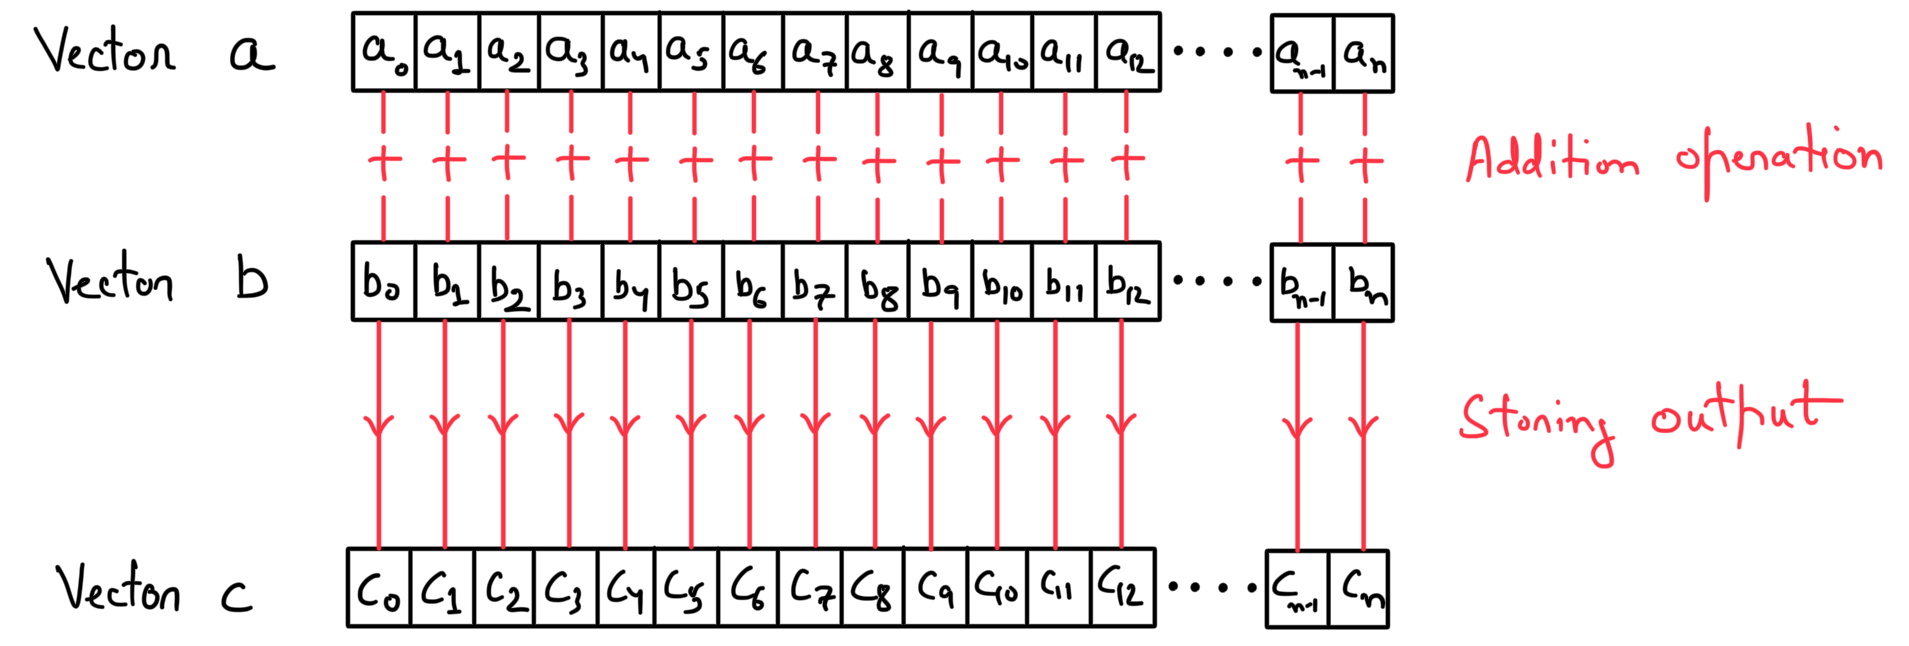
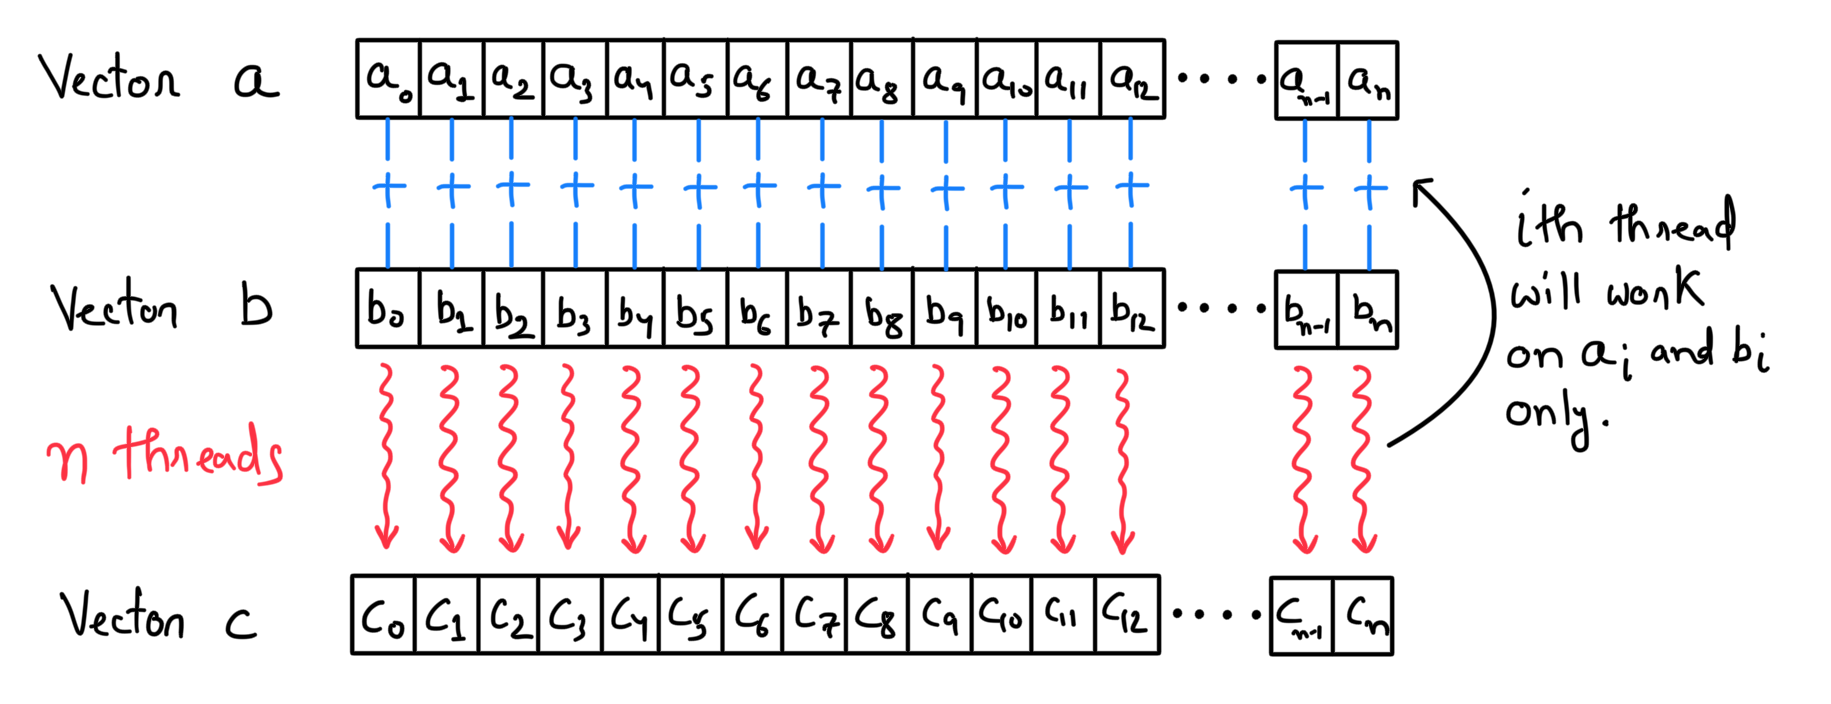
Vector addition is the "hello world" program of parallel programming. When two vectors \(\textbf{a}\) and \(\textbf{b}\) of length \(n\) are added together, the output (say vector \(\textbf{c}\)) contains the sum of the corresponding components.
Sequential vector addition on a CPU
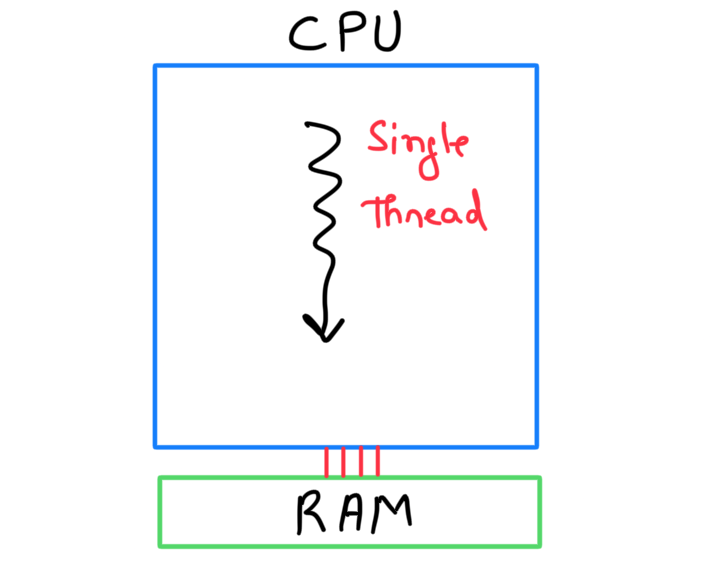
While running a program sequentially, there are two main hardware components that you should keep in mind.
- CPU: This is the workhorse that produces a thread. For a sequential program, you can assume it spawns a single thread (even if your CPU supports multi-threading).
- Random Access Memory (RAM): This is a storage unit where data is stored. A CPU thread accesses data from RAM and works on it.
The sequential code for vector addition is fairly simple. There are four steps:
- Define the length
Nof vectors. - Allocate host memory (RAM) for vectors
A,B,C, and then initialize them appropriately. - Perform sequential vector addition.
- Free the host memory.
// Sequential vector addition
void vec_add_cpu(float* A, float* B, float* C, int N)
{
    // Loop over elements of vectors one by one
    for (int i = 0; i < N; i++)
        C[i] = A[i] + B[i];
}

int main(int argc, char const *argv[])
{
    // 1) Length of arrays
    int N = 10;

    // 2) Memory allocation
    float* A = (float*)malloc(N*sizeof(float));
    float* B = (float*)malloc(N*sizeof(float));
    float* C = (float*)malloc(N*sizeof(float));

    // Initialize A, B and C
    for (int i = 0; i < N; i++)
    {
        A[i] = (float)(rand() % (10 - 0 + 1)+0);
        B[i] = (float)(rand() % (10 - 0 + 1)+0);
        C[i] = 0;
    }

    // 3) Vector addition on a CPU
    vec_add_cpu(A, B, C, N);

    // 4) Free memory
    free(A);
    free(B);
    free(C);

    return 0;
}Looking at the code and the description of vector addition, you can see that the operations on each element of the vectors can be performed independently. In other words, I can eliminate the loop in the function vec_add_cpu() (which goes over the elements one by one). Instead, I can assign each iteration to an independent GPU thread, which can all work in parallel to give the correct output.
Parallel vector addition on a GPU
For parallel execution, we have two different hardware components.
- GPU: It's the workhorse that produces multiple threads that work in parallel on different subsets of data.
- Video Random Access Memory (VRAM): It's a storage unit for the GPU. GPU threads can access data from this memory.
A GPU can't function independently. It's the job of a CPU to move data between RAM and VRAM and launch the kernel function (which then executes the operations in parallel on a GPU). In other words, a CPU can be seen as an instructor who manages most of the tasks and is responsible for assigning specific tasks to the GPU (where it has an advantage).
Broadly speaking, there are eight steps to perform parallel vector addition on a GPU:
- Define the length
Nof vectors. - Allocate host memory (RAM) for vectors
A,B,C, and then initialize them appropriately. - Allocate device memory (VRAM) for vectors
A,B, andC. - Copy data related to vectors
AandBfrom RAM to VRAM. - Execute device kernel that performs parallel computations on a GPU. In this step, we define:
- The number of blocks in the grid.
- The number of threads in each block.
- Copy the result of vector addition from VRAM to RAM.
- Free device memory.
- Free host memory.
#include <stdio.h>

// CUDA error checking code
#define CUDA_CHECK(err) {if (err != cudaSuccess){printf("%s in %s at line %d \n", cudaGetErrorString(err), __FILE__, __LINE__);exit(EXIT_FAILURE);}}

// Parallel vector addition kernel
__global__ void vec_add_kernel(float* A, float* B, float* C, int N)
{
    int i = blockDim.x*blockIdx.x + threadIdx.x;

    if (i < N)
    {
        C[i] = A[i] + B[i];
    }
}


int main(int argc, char const *argv[])
{
    // 1) Length of arrays
    int N = 10;

    // 2) Memory allocation
    float* A = (float*)malloc(N*sizeof(float));
    float* B = (float*)malloc(N*sizeof(float));
    float* C = (float*)malloc(N*sizeof(float));

    // Initialize A, B and C
    for (int i = 0; i < N; i++)
    {
        A[i] = (float)(rand() % (10 - 0 + 1)+0);
        B[i] = (float)(rand() % (10 - 0 + 1)+0);
        C[i] = 0;
    }

    // 3) Allocate device memory
    float* d_A; // Device pointer for vector A
    cudaError_t err_A = cudaMalloc((void**) &d_A, N*sizeof(float)); // Device memory allocation for vector C
    CUDA_CHECK(err_A); // Checking to ensure that device memory allocation was successful

    float* d_B; // Device pointer for vector B
    cudaError_t err_B = cudaMalloc((void**) &d_B, N*sizeof(float)); // Device memory allocation for vector B
    CUDA_CHECK(err_B); // Checking to ensure that device memory allocation was successful

    float* d_C; // Device pointer for vector C
    cudaError_t err_C = cudaMalloc((void**) &d_C, N*sizeof(float)); // Device memory allocation for vector C
    CUDA_CHECK(err_C); // Checking to ensure that device memory allocation was successful

    // 4) Copy data from RAM to VRAM
    cudaError_t err_A_ = cudaMemcpy(d_A, A, N*sizeof(float), cudaMemcpyHostToDevice); // Copying A to device memory
    CUDA_CHECK(err_A_); // Checking to ensure that RAM to VRAM copy was successful

    cudaError_t err_B_ = cudaMemcpy(d_B, B, N*sizeof(float), cudaMemcpyHostToDevice); // Copying B to device memory
    CUDA_CHECK(err_B_); // Checking to ensure that RAM to VRAM copy was successful

    // 5) Kernel execution
    dim3 dim_block(4, 1, 1); // Defining the number of threads in a block
    dim3 dim_grid(ceil(N/4.0), 1, 1); // Defining the number of blocks in a grid
    vec_add_kernel<<<dim_grid, dim_block>>>(d_A, d_B, d_C, N);

    // 6) Copy back results from VRAM to RAM
    cudaError_t err_C_ = cudaMemcpy(C, d_C, N*sizeof(float), cudaMemcpyDeviceToHost); // Copying the result stored in C to host memory
    CUDA_CHECK(err_C_); // Checking to ensure that VRAM to RAM copy was successful

    // 7) Free device memory
    cudaFree(d_A);
    cudaFree(d_B);
    cudaFree(d_C);

    // 8) Free host memory
    free(A);
    free(B);
    free(C);

    return 0;
}Device memory allocation
The host code calls the cudaMalloc function to allocate memory for the data on VRAM. This function accepts two parameters:
- The first parameter is the address of the pointer variable. The address of this pointer should be cast to
(void **)because the function expects a generic pointer (not restricted to a specific type). - The second parameter is the size of the data to be allocated (in number of bytes).
This will allocate a specific amount of memory in VRAM and set the pointer (whose address is passed as 1st parameter) to point at this memory location. The first parameter is the address of the pointer because this allows the cudaMalloc function to return a value (of type cudaError_t) reporting errors during memory allocation (which can then be passed to the CUDA error-checking code).
// 3) Allocate device memory
float* d_A; // Device pointer for vector A
cudaError_t err_A = cudaMalloc((void**) &d_A, N*sizeof(float)); // Device memory allocation for vector C
CUDA_CHECK(err_A); // Checking to ensure that device memory allocation was successful

float* d_B; // Device pointer for vector B
cudaError_t err_B = cudaMalloc((void**) &d_B, N*sizeof(float)); // Device memory allocation for vector B
CUDA_CHECK(err_B); // Checking to ensure that device memory allocation was successful

float* d_C; // Device pointer for vector C
cudaError_t err_C = cudaMalloc((void**) &d_C, N*sizeof(float)); // Device memory allocation for vector C
CUDA_CHECK(err_C); // Checking to ensure that device memory allocation was successful
Data copy from host to device memory and vice-versa
Once the memory has been allocated in the VRAM, data can be transferred from RAM using cudaMemcpy function. This function accepts four parameters:
- Pointer to the destination: When copying data from RAM to VRAM, this will be the device variable pointer (i.e.,
d_Aord_B), and when copying results from VRAM to RAM, this will be the host variable pointer (i.e.,C). - Pointer to the source: When copying data from RAM to VRAM, this will be the host variable pointer (i.e.,
AorB), and when copying results from VRAM to RAM, this will be the device variable pointer (i.e.,d_C). - Number of bytes to be copied.
- The direction of transfer: When copying data from RAM to VRAM, this will be
cudaMemcpyHostToDevice, and when copying results from VRAM to RAM, this will becudaMemcpyDeviceToHost. Note that these are two symbolic predefined constants of the CUDA programming environment.
// 4) Copy data from RAM to VRAM
cudaError_t err_A_ = cudaMemcpy(d_A, A, N*sizeof(float), cudaMemcpyHostToDevice); // Copying A to device memory
CUDA_CHECK(err_A_); // Checking to ensure that RAM to VRAM copy was successful

cudaError_t err_B_ = cudaMemcpy(d_B, B, N*sizeof(float), cudaMemcpyHostToDevice); // Copying B to device memory
CUDA_CHECK(err_B_); // Checking to ensure that RAM to VRAM copy was successful

// 6) Copy back results from VRAM to RAM
cudaError_t err_C_ = cudaMemcpy(C, d_C, N*sizeof(float), cudaMemcpyDeviceToHost); // Copying the result stored in C to host memory
CUDA_CHECK(err_C_); // Checking to ensure that VRAM to RAM copy was successful
Kernel execution
The algorithm for parallel vector addition is quite simple. For the vectors of length \(n\)
- I want \(n\) different threads.
- Where each thread will
- Retrieve the corresponding element of the vectors \(\textbf{a}\) and \(\textbf{b}\) stored in VRAM.
- Perform a simple addition of the two values.
- Store the result in the corresponding location of the vector \(\textbf{c}\) (whose space is allocated in VRAM).
The next step is to define the device thread organization. The blocks in a grid and the threads in each block can be organized as 1D (x), 2D (x,y), or 3D (x,y,z). The data structure dictates whether 1D would be sufficient or 2D/3D organization is required. In this example, the data is a 1D vector, so a 1D grid and 1D blocks should work well. I decided to go with 4 threads in each block. As there are \(n=10\) total elements, it means that I will need a total of 3 blocks. Remember that each block must have the same number of threads, so in doing this, the program will spawn a total of 12 threads. All the blocks are indexed, i.e., in this case, I will have block indices ranging from 0 to 2. The threads in each block are indexed as well. The thing to note is that thread indices are local to each block, i.e., each block will have thread indices ranging from 0 to 3.
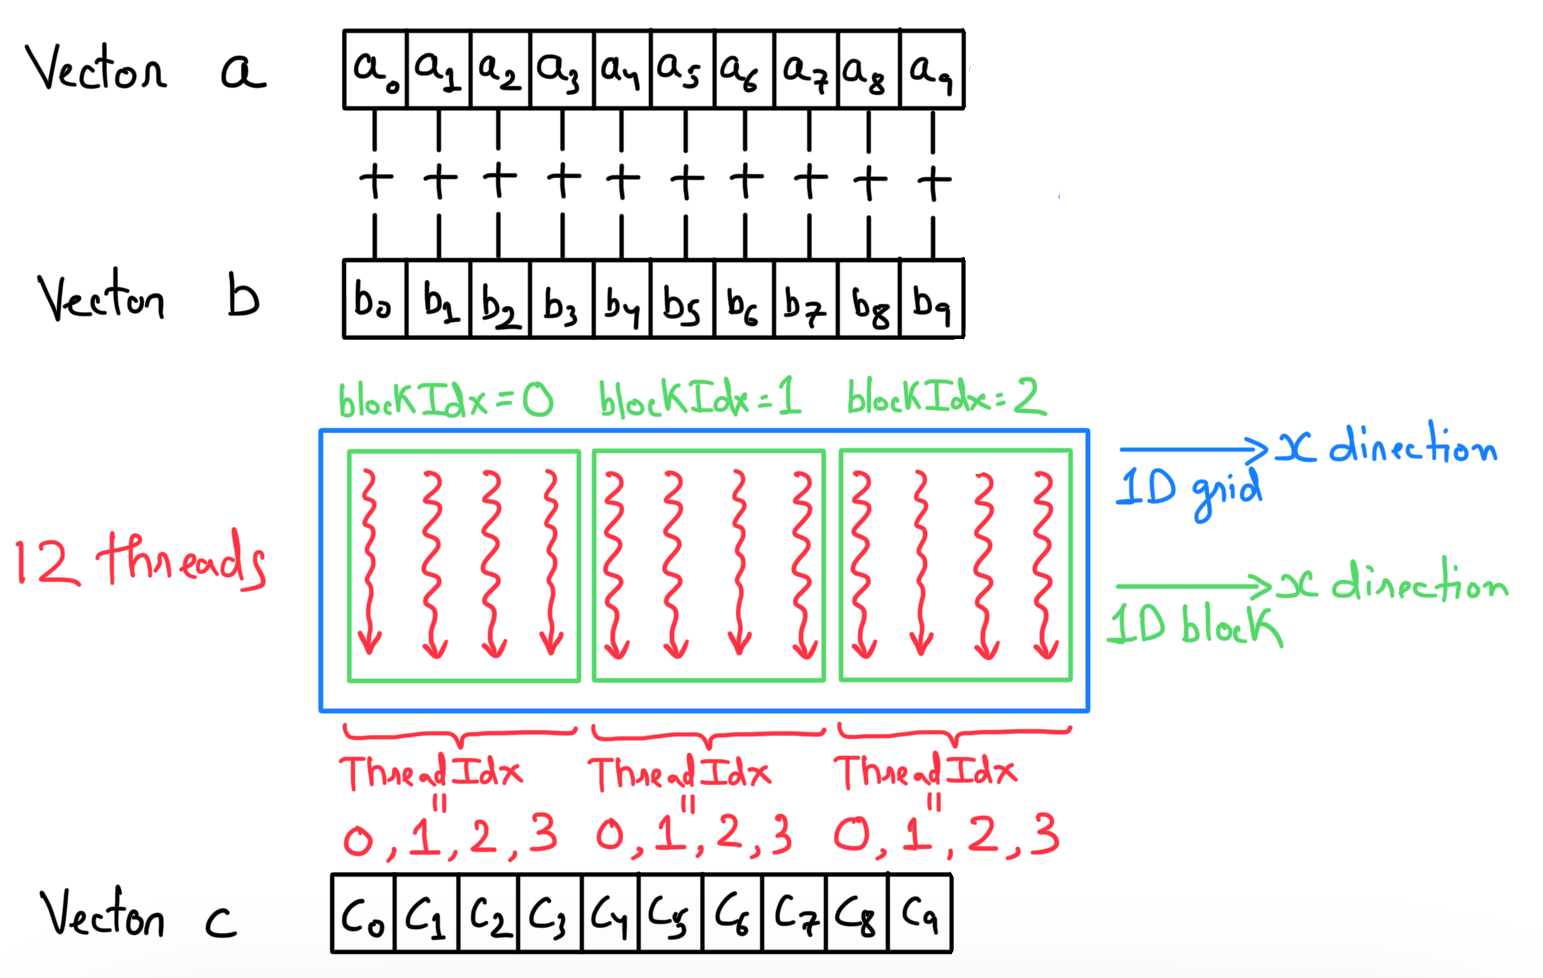
The custom-defined CUDA type dim3 defines
- The number of threads in each block:
dim3 dim_block(4, 1, 1). Note that in this case, the y and z dimensions are set to 1. - The number of blocks in the grid can then be decided based on the length of vectors and the total threads in each block:
dim3 dim_grid(ceil(N/4.0), 1, 1).
The kernel function vec_add_kernel is then executed by specifying the grid organization inside <<< >>> and passing the device variables.
vec_add_kernel<<<dim_grid, dim_block>>>(d_A, d_B, d_C, N);An important thing to remember is that each thread executes the same vec_add_kernel function. So, the very first thing is to identify which thread it is (in the global context), and that's done using CUDA variables named blockDim.x (number of blocks in the grid), blockIdx.x (which block does this thread belong to) and threadIdx.x (the thread index inside the specific block). The next thing is to check whether this thread maps to an element in the arrays (remember, there are two additional threads at the end that should not do anything). Finally, the addition is performed, and the result is stored at the corresponding index in the output array.
// Parallel vector addition kernel
__global__ void vec_add_kernel(float* A, float* B, float* C, int N)
{
    // Identify the global index of the thread
    int i = blockDim.x*blockIdx.x + threadIdx.x;

    // Check if the thread maps to the element in the arrays
    if (i < N)
    {
        // Addition operation
        C[i] = A[i] + B[i];
    }
}__global__ is a qualifier keyword that suggests this function is callable from the host and can only be executed on the device.Free device memory
At last, when everything is done, the device memory can be freed using a simple cudaFree function.
// 7) Free device memory
cudaFree(d_A);
cudaFree(d_B);
cudaFree(d_C);
Conclusions
Now that I've explained the basics of GPGPU. Let me summarize everything by answering the questions asked at the start of this blog post.
- What is the main difference between a CPU and a GPU?
Ans. CPU is a latency-oriented device designed to solve complex problems quickly using very few powerful processors with sophisticated control logic. GPU is a throughput-oriented device with many weak processors designed to work on large datasets in parallel by dividing them into multiple chunks.
- Why do applications run faster on a GPU, and is that always true?
Ans. GPU can exploit data parallelism very well. This is the main reason behind the speed-up. However, the data transfer between RAM and VRAM is slow. So, if the overall problem has a small dataset, the time taken to transfer data will be more than the speed-up from parallelization.
- How can I code a simple program and run it on a GPU?
Ans. CUDA C provides a convenient framework to write functions that can run directly on the GPU.
The code repository for this blog post can be accessed using this link.